Get ahead
VMware offers training and certification to turbo-charge your progress.
Learn moreSpring AI offers support for Model Context Protocol, or MCP for short, which allows AI models to interact with and access external tools and resources in a structured way. With Spring AI, developers can create their own MCP Servers and expose capabilities to AI models in just a few lines of code.
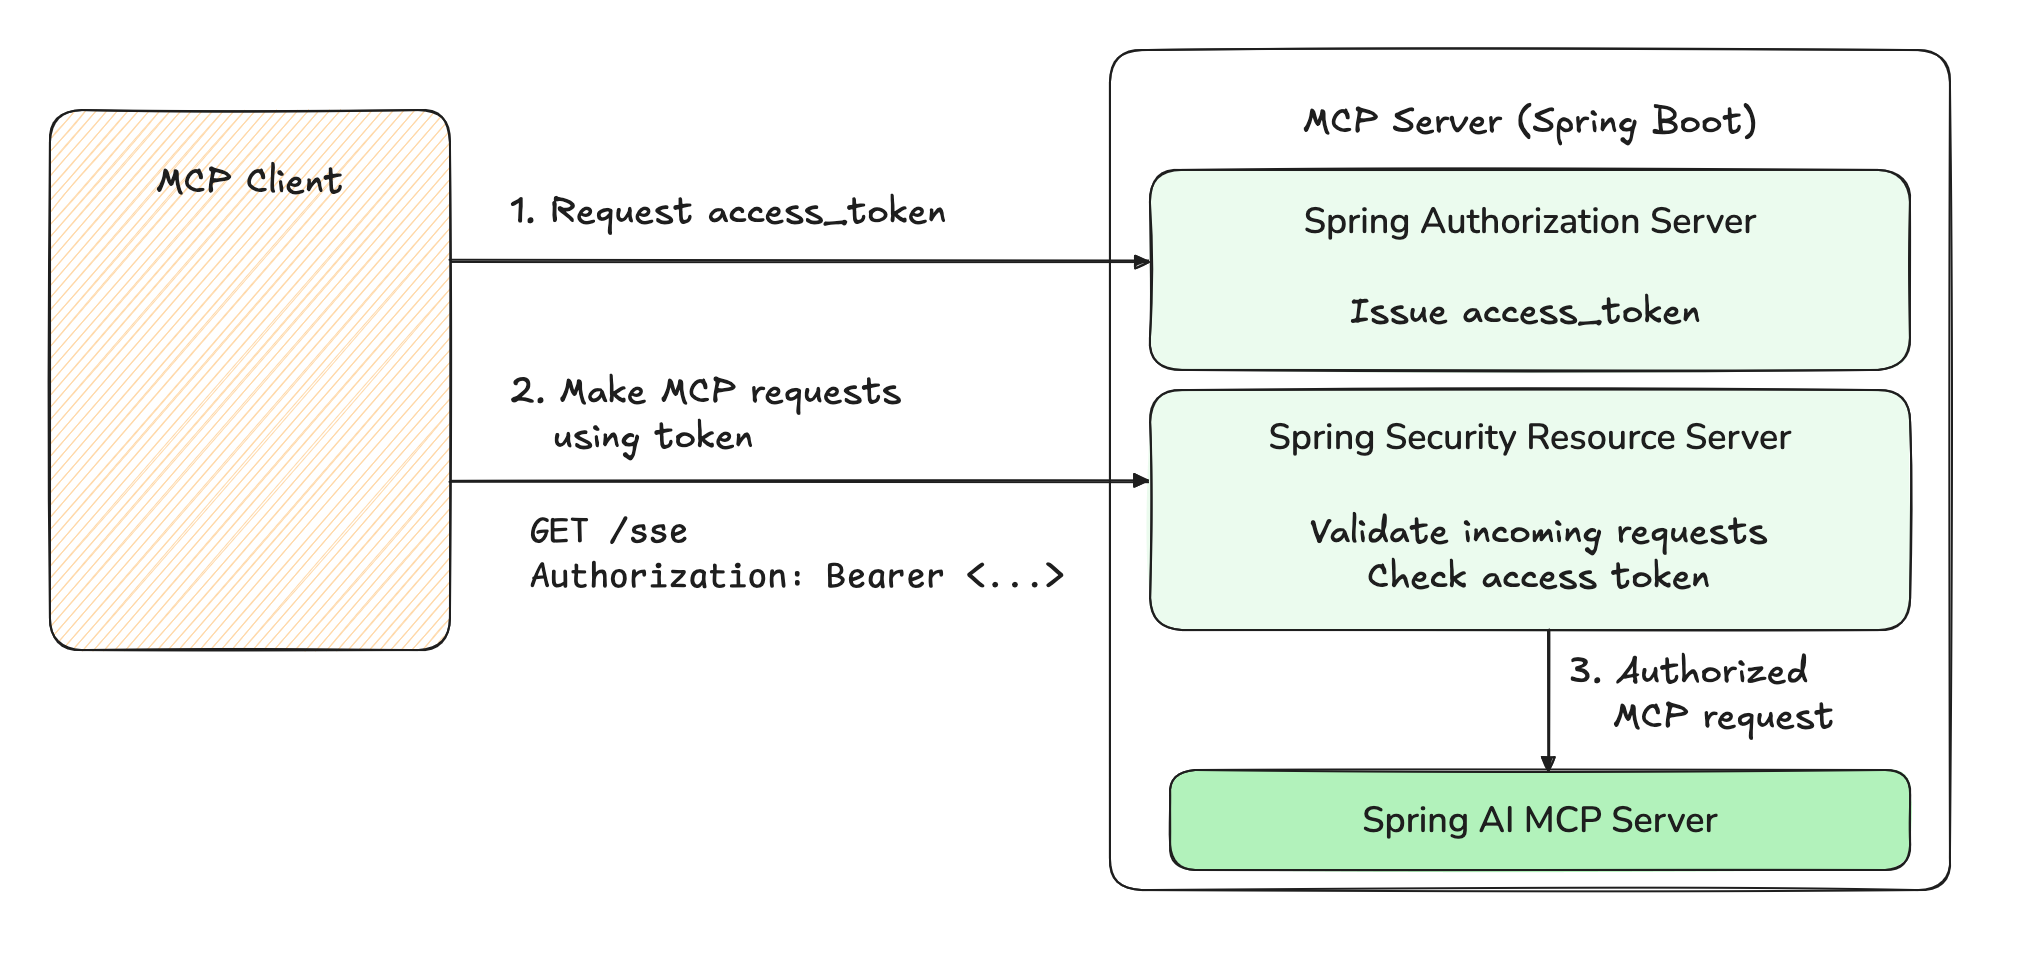
MCP Servers can run locally, using the STDIO transport. To expose an MCP server to the outside world, it must expose a few standard HTTP endpoints. While MCP Servers used privately might not require strict authentication, enterprise deployments need robust security and permission management for exposed endpoints. This challenge is addressed in the newest version of the MCP specification (2025-03-26), which was released last week. It lays the foundation for securing communications between Clients and Servers, leveraging the widespread OAuth2 framework.
While we won't do a full review of OAuth2 in this blog post, a quick refresher might prove useful. In the draft of the spec, the MCP Server is both a Resource Server and an Authorization Server.
As a Resource Server, it performs authorization checks on incoming requests by checking the Authorization header.
The header MUST contain an OAuth2 access_token, which is a string representing the "permissions" of the Client.
That token may be a JSON Web Token (JWT) or an opaque string that does not carry information by itself.
If the token is missing or invalid (malformed, expired, wrong recipient, ...), the Resource Server rejects the request.
Using those tokens, a typical request might look like:
curl https://mcp.example.com/sse
    -H "Authorization: Bearer <a valid access token>"
As an Authorization Server, the MCP Server must also be able to issue access_tokens for clients in a secure fashion.
Before issuing a token, the Server will verify the Client's credentials, and, in some cases, the identity of the user trying to access the Server.
The Authorization Server will decide the characteristics of the token: its expiry, scope, intended audiences, etc.
Using Spring Security and Spring Authorization Server, we can easily add both capabilities to an existing Spring MCP Server.
In this example, we will add OAuth 2 support to a sample MCP Server - the "Weather" MCP tool from our Spring AI examples repository. We will not explore the client-side of the interaction, only ensure our server can issue tokens and validate them.
First, we import the required Boot starters in pom.xml:
<dependency>
    <groupId>org.springframework.boot</groupId>
    <artifactId>spring-boot-starter-oauth2-resource-server</artifactId>
</dependency>
<dependency>
    <groupId>org.springframework.boot</groupId>
    <artifactId>spring-boot-starter-oauth2-authorization-server</artifactId>
</dependency>
Then, we configure an OAuth2 Client in our application.properties, so that we can request access tokens:
spring.security.oauth2.authorizationserver.client.oidc-client.registration.client-id=mcp-client
spring.security.oauth2.authorizationserver.client.oidc-client.registration.client-secret={noop}secret
spring.security.oauth2.authorizationserver.client.oidc-client.registration.client-authentication-methods=client_secret_basic
spring.security.oauth2.authorizationserver.client.oidc-client.registration.authorization-grant-types=client_credentials
This is the simplest possible client.
We can interact with the authorization server directly by making POST requests, no browser needed, and use the hard-coded credentials mcp-client / secret.
The last step is to enable the authorization server and resource server features.
We do so by creating a configuration class for our security features, for example SecurityConfiguration, in which we expose a SecurityFilterChain bean:
import static org.springframework.security.oauth2.server.authorization.config.annotation.web.configurers.OAuth2AuthorizationServerConfigurer.authorizationServer;

@Configuration
@EnableWebSecurity
class SecurityConfiguration {

	@Bean
	SecurityFilterChain securityFilterChain(HttpSecurity http) throws Exception {
		return http.authorizeHttpRequests(auth -> auth.anyRequest().authenticated())
			.with(authorizationServer(), Customizer.withDefaults())
			.oauth2ResourceServer(resource -> resource.jwt(Customizer.withDefaults()))
			.csrf(CsrfConfigurer::disable)
			.cors(Customizer.withDefaults())
			.build();
	}

}
This filter chain will do a number of things:
access_token.With this, our application is secured, and will only accept requests that have an access token.
Otherwise, requests will be rejected, with an HTTP 401 Unauthorized error. For example:
curl http://localhost:8080/sse --fail-with-body
#
# Response:
#
# curl: (22) The requested URL returned error: 401
To use our MCP server, we need to obtain an access token first.
We use the client_credentials OAuth2 grant, which is used in "machine to machine" or "service account" scenarios:
curl -XPOST http://localhost:8080/oauth2/token --data grant_type=client_credentials --user mcp-client:secret
#
# Response:
#
# {"access_token":"<YOUR-ACCESS-TOKEN>","token_type":"Bearer","expires_in":299}%
Copy the value of the access_token. It starts with letters "ey".
We can now use this access token to make requests, and they should succeed.
For example using curl, your can replace YOUR_ACCESS_TOKEN by the value you copied above:
curl http://localhost:8080/sse -H"Authorization: Bearer YOUR_ACCESS_TOKEN"
#
# Response:
#
# id:918d5ebe-9ae5-4b04-aae8-c1ff8cdbb6e0
# event:endpoint
# data:/mcp/message?sessionId=918d5ebe-9ae5-4b04-aae8-c1ff8cdbb6e0
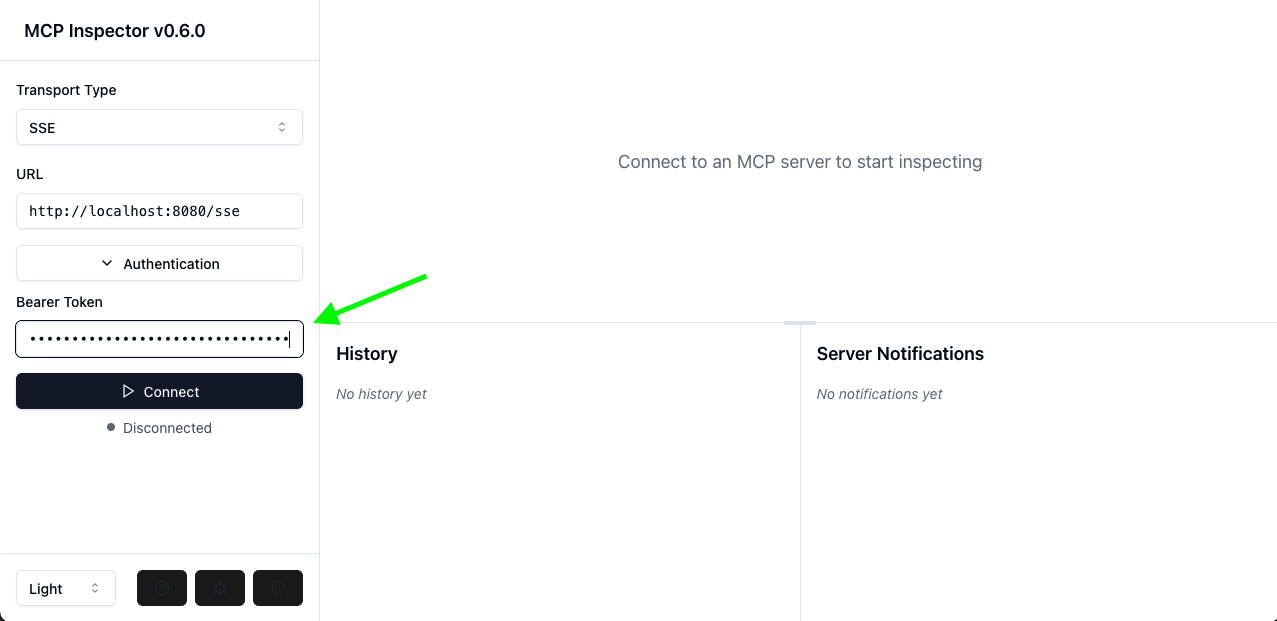
It is also possible to use the access token directly in the MCP inspector, since version 0.6.0.
Simply spin up the inspector, and paste the access token in the "Authentication > Bearer" field on the left-hand menu.
Then click Connect: you should be able to make MCP calls.
If you would like to run this yourself, you can check out the sample code in the spring-ai-examples repository.
In this example, we have implemented foundational OAuth2 capabilities in the MCP Server.
The obvious next step is to update MCP Client and allow it to authenticate with the Server, and use the "authorization code" OAuth2 grant. With this flow, users can log in with their own credentials, and obtain user-bound tokens, allowing for more fine-grained permissions, for example with Roles-Based Access Control (RBAC).
We will also explore using an external OAuth2 Authorization Server for issuing tokens, and only implementing the Resource Server capabilities in our MCP Servers.

VMware offers training and certification to turbo-charge your progress.
Learn moreTanzu Spring offers support and binaries for OpenJDK™, Spring, and Apache Tomcat® in one simple subscription.
Learn moreCheck out all the upcoming events in the Spring community.
View all